What is up with the HUGE header on my blog you may be asking or not? Well it is no secret that I am still very new to the blog world, so please excuse me as I try to put what is in my mind on to my blog. It may take a while.
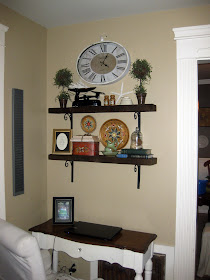
Now that, that is all cleared up I will move onto my SHELVES! Can you hear the excitement? You may have gotten the idea that I LOVE old wood. If not, now you know. I LOVE old wood. I mean really old, the kind with nail holes or even better with the old nails still in them. The kind that most people tear out of old homes and throw out. Oh if I could find those dumpsters. Well fortunately I have people in the world that love me enough to bring me old smelly and sometimes molded wood. I get so giddy, my head spins and I can't stop thinking of what amazing creations I will make with it. Well this is one of those times. Remember the old mill wood that my brother had found for me that I made the coat rack for the playroom out of? Well I had more of it! Yay!
I have been really wanting some nice shelving in my living room to display more of my special sentimental things, or what my husband lovingly refers to as (my junk), potato patoto, either way I wanted shelves. I looked at Ballard designs, Restoration Hardware, Pottery Barn, Home Goods. I also searched Craiglist, Etsy, and Ebay. I found many beautiful shelves that would work but of course the ones I want were $150 or more PER SHELF! Yikes! Suddenly I became brilliant and really loved myself for my grand idea. I may have even patted my own back, but I would never admit to it. I would make shelves out of the wood from my brother. I am genius right? Duh! What took so long for me to figure it out.
So I didn't waste anymore time. My dad came to visit last month and I put him to work. He ripped the board down the middle (I love that term...means to cut it) and cut the end off slightly so they would be even. I wanted two shelves that would fit my wall in length but would not stick out too far. It was PERFECT. All I did was very lightly sand them with a sanding block and coat them with a dark wax. Done! I found simple black metal brackets at Lowes and presto. Perfection. I even hung them myself...well sort of. I had hung the first shelf using Bobby's drill and level. I was so proud because unlike I normally do, I actually measured and made sure it was even, instead of just eyeing it. Well it became more difficult to hang the second shelf, because I was standing on my desk and trying to drill in one end of the shelf to the wall while still holding the other end up....hmmm. This is when long arms would come in handy. Bobby came home while I was trying to figure out what I could boost under the shelf to hold it up. I was kind of annoyed and relieved at the same time. Some how I wanted to prove that I could do it all myself and yet I knew that I needed help....can you say prideful. So I humbly admitted my failure and asked for help. In the end I didn't care because my shelves were up and I loved them. I spend the rest of the afternoon filling them with my special stuff. Surprisingly I have not changed them up since I did it. This only happens when I am completely satisfied with it. And I am...for now!
So what do you think? Is it just me or do you love them too? On another note if you look in the background of the second picture you can see my little Jonny cutie at the table playing with his legos. I posted that one just because he is so cute!


They look great, Kelli! I've been wanting to do something similar in our dining room and it's a great idea to use salvaged wood!
ReplyDeletein love! saw something similar in Living magazine and i'm going to put up 3 level corner shelves in our new kitchen! awesome job they look gorgeous!!
ReplyDelete